The next step is the best part where the writer gets
to explore and further experiment and investigate on the printing process of
traditional Japanese woodblock print. It begins with a preparation of sketches
and choosing the right images to be used for printing (Figure 14). The decision
of choosing nature as the main theme was inspired by Hiroshige's beautiful
landscape of Autumn Moon over Ishiyama. During the ukiyo-e period,
the artist would provide a picture of line drawing called hanshita to
the carver. The drawing is made on a thin paper, either of kōzo or mitsumata fibre. These
types of paper are the best to use because it can be easily transferred to
blocks. The paper then is treated with dōsa, a sizing and
later rubbed with baren to flatten the surface on to the block. Instead of ink,
the Japanese used sumi as the medium of drawing as ink will be blurred out with
the moisture of paste when hanshita is placed. Pasting a hanshita requires
care and speed since the paper is soft and thin. An amount of paste
is spread evenly on the block. The paper then must be quickly adjusted into
position and then rubbed to make it even. When the paper is in contact with the
block, the top layer must be peeled off. According to Justin Sander, there is
another alternative way to paste the sketches onto the blocks with the help of the
photocopy machine. Sketches on A4 paper need to be photocopied for each of the
blocks. As seen in Figure 15, arabic gum must be quickly spread evenly on each
of the block by using a sponge and then the sketches are rubbed evenly using
hand. It is left to dry for a few minutes and afterward is ready to be
carved.
 |
| Figure 14: Line sketch |
 |
| Figure 15: Method of pasting sketches onto the blocks |
Each of the blocks needs to be classified for colours
and key block (Figure 16). Generally, one block can be used for more than one
colour. That is why it is necessary for the artist to plan well before printing
based from the explanation by Justin Sander in the videos below. However, to
avoid shrinkage or distortion of the design, it is better to use less
pigment. It is also important to ensure that the blocks are the same size
in width and height.
 |
Figure 16: Classified colours and key block
|
 |
| Figure 17: How to hold a tō |
After each of the blocks has been
classified, the next step is to start carving. The process of carving can be
divided into two categories. Firstly, lines need to be cut to an even depth by
using tō and then the process continues with the removal of the
unnecessary parts using other tools. It is important to make sure that all the tools
are sharp. Figure 17 shows the way of how the tō should be held which is by
holding it at a 30 degree angle. The left hand should always be placed
behind the right hand to avoid from any injury. According to Yoshida T., and Yuki R., (1966), the thumb on the top serves to regulate the pressure so that the
block is cut to an even depth, regardless of the soft or hard parts of the
grain while the middle finger of the left hand serves to support the tō and prevent it from slipping. Hughes A. A.,
and Morris H. V., (2008) also agreed that, in order to exercise control and pressure, the
end of the handle must sit in the palm, while the forefinger rests on the top
of the brass sleeve, and the thumb and the second finger are placed on either
side. To secure the block while cutting, the block must be placed on another
board with a strip of wood attached on top (Figure 18). The shape should
be cut from the centre part until the outer edges. Subsequently after the
cutting of the shape is completed, unneeded parts of the block should be
removed. For the ukiyo-e artisan, sōainomi,
marunomi and aisuki are suitable tools to be used to
cut away the unnecessary parts. The areas that are cut away will be white,
leaving the uncut top surface to hold the ink and produce the print. Since
tools available were limited at the time, those tools have been replaced by komasuki and sankakutō
(as shown in the video below). During the experience of
cutting, the writer learned that it is important to go along with the grain as
it is much easier to carve. To cut the key block, great skill and care are
highly important as it consists only of lines of drawing especially when working
with the curves. Each of the blocks was carved based on the shape needed. Since
only four Japanese grain blocks were available, the writer used a reduction method
in one of the blocks to produce multiple colours for printing. As mentioned
earlier, it is necessary for the artist to plan well before printing. However,
should there be a mistake in cutting, the artist can replace the soiled block
with another fragment of block and glue them together as shown in Figure
19.
 |
| Figure 18: The block is placed on another board with a strip of wood attached on the top |
 |
Figure 19: Replacing
a soiled block
|
After the cutting of the blocks is completed (Figure 20), the next step
is to create kentō which is a device to insure the register of
the paper during the printing process. For centuries, it has been proven that kentō is
the best method to apply in order to secure the paper from moving. Kagi and hikitsuke were
cut directly on each of the block to keep the margin the same width as the key
block (Figure 21). Kentōnomi and aisuki were
used to create kentō by cutting away the unnecessary parts. Kentō must
be placed on a flat and smooth surface to make sure that the paper fits during
printing. The depth required is two times the thickness of the paper.
 |
| Figure 20: Carved blocks |
 |
| Figure 21: Kagi and Hikitsuke |
After the kentō is completed, the next step is to print the blocks for
trial proof. Based on the example given in the video below, in order to
apply pigment on the block in the way of the traditional Japanese
woodblock print, a proper brush needs to be mixed with ink and water and then straight
away applied onto the block. This is agreed by Rothenstein M., (1970), who mentioned that in Japan, the water soluble printing inks
commonly used are applied to the blocks with brushes of various kinds. Brush
inking offers a good deal of freedom since different shapes on a single block
may be coloured separately. As mentioned earlier, the basis of
traditional Japanese woodblock print is by using paste as their basis of colour
which must be mixed with pigment using a brush. The paste is called himenori,
which is made out of refined rice and water. For instant results and to avoid
any hassle, the author decided to use the ready packed Daler Rowney System
3 block printing water-based ink.
In contrast to the traditional way, the modern way of applying pigment
onto block is by using a roller. As shown in the video below, the ink must be
mixed together with a scrapper before it is rolled up with a roller to get a
well blended flat colour. Before proceeding with the printing, the artist needs
to moisten the papers. This is to avoid the papers from having wrinkles. The
papers need to be moist with a sheet placed on top of another sheet. Based on the
Japanese traditional way of moistening papers, the printer uses the mizubake to
apply water in sufficient quantities to alternate sheets. This is followed by the
pilling of the sheets according to the otosu or hawasu
method. Nevertheless, the most common method is hawasu. It is
created to ensure the evenness of moisture.
Based on Figure 22, the sheets are placed on yoko-ita which is
known as plate by slightly sliding each sheet about one inch onto another
sheet. The entire sheets are then covered with wet flannel cotton cloth and
left in this condition overnight. However, according to Justin Sander,
another easier way to moisten the papers is by using spray bottle. The
water needs to be sprayed evenly on the paper and covered with another paper, leaving
the paper for a few minutes and then the paper is ready for printing (Figure
23).
 |
| Figure 22: The method of hawasu |
 |
| Figure 23: Moistening paper by using spray bottle |
After the inks have been applied on the blocks, the paper is then
placed according to the registration of kentō. This is followed by the paper being
rubbed with baren either in a circular motion or zigzag pattern depending on
the size of the image. Each of the methods gives different effects when
printing. Based on the video shown below, when pigment is applied using a brush,
the impression shown on the paper has almost the same effect of watercolour
combined with wood marks. It is advisable that the same brush is not used for
different colours. In contrast, when the pigment is applied with a roller, a
flat wood mark of the mirror image will appear on the surface of the paper.
When removing the print from the block, it is advisable to remove it with clean
hands and the best way to avoid from soiling is to avoid dragging and letting
it fall on the hollow parts of the block.
Additionally, baren also plays an
important role in getting the effect that you desire. It is advisable to
experiment with many different kinds of baren to understand how it works in
terms of pressure and effect. It all lies in its disk form. As remarked
by Rothenstein M.,(1970), a spoon is also comfortable to hold and has a
broad rounded under surface. The more pressure is apply, the more effective the spoon prints. For the Japanese
baren, it prints effectively enough as it has a broader surface. The author
personally prefers to use the Japanese baren as strong pressure is not
required. Referring to Yoshida T., and Yuki R., (1966), the picture shown below (Figure 24) explains the idea of
how the baren works.
 |
| Figure 24: How baren works |
As seen on many ukiyo-e woodblock
prints, one of the most appealing element is the gradient background of the sky
with a combination of more than one colour in one go. For the traditional
Japanese style, the area of the sky needs to be cut little by little with a kentōnomi to
form a gentle slope. Before printing, a combination of colours needs to be applied
on the block with a brush. When printed, the colour appears to fade out at the
edge according to the angle of the slope. Another gradient technique that can
be applied is by using a roller without having to cut away the area of the
block. A combination of colours needs to be placed next to each other and then
rolled down with a roller. It is important for the artist to make sure that the
gradient is in the middle between the colours and the thickness of the
pigments is even. An example of this technique is given below.
According to Justin Sander, another modern technique to replace the
element of gradient in woodcut printing is by using airbrush (Figure 25).
Although the marks of wood grain will not appear on the paper, it is much easier
to achieve the gradient effect of the sky by spraying the ink straight onto the
paper. After experimenting
with different types of paper and producing several trial proofs (as shown in
Figure 26 and the video shown below), the same process of printing needs to be
repeated until the artist is satisfied with the final trial proof. Similar
materials and tools need to be used to get the same effect as the final trial
proof. At least 10 copies need to be produced for editions.
 |
| Figure 25: Gradient effect by using airbrush |
 |
Figure 26: Trial proofs
|
To understand the
whole process of traditional multi-colour Japanese woodblock
print, a brief explanation of what the writer has explained earlier is
shown in the video below which demonstrates the process from the beginning
stage of sketches to the very last stage of printing.
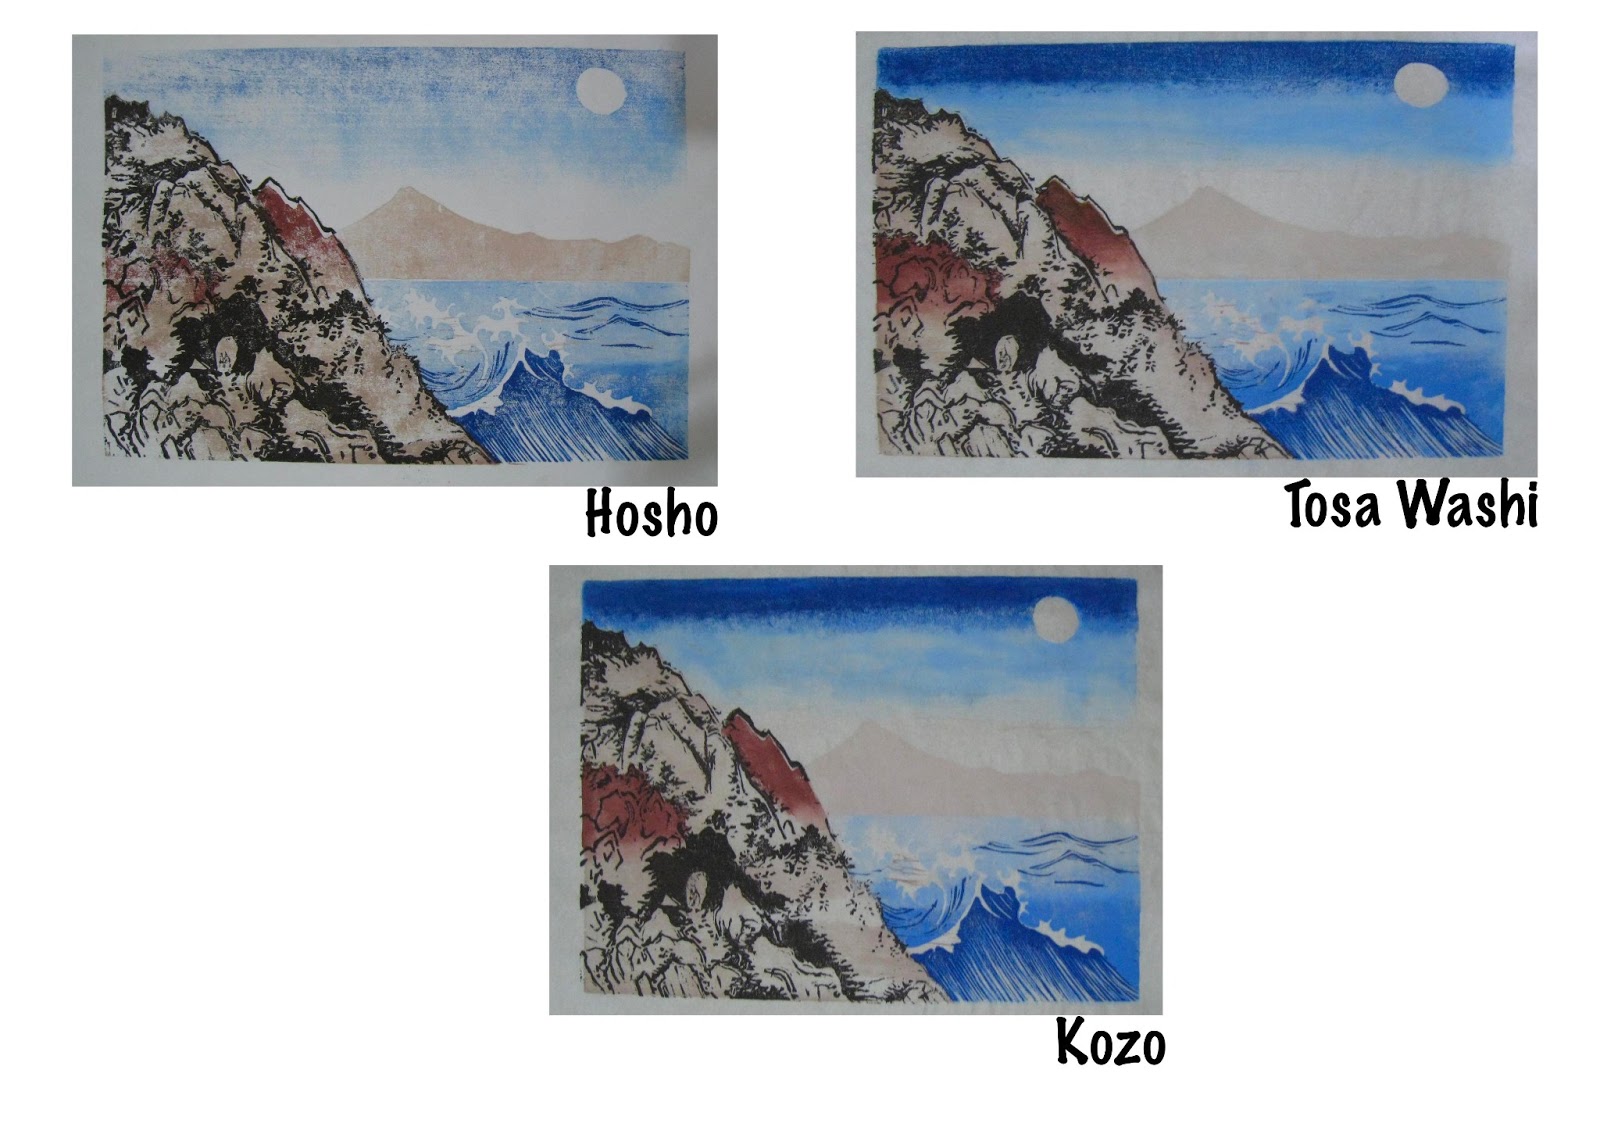
Once satisfied with the final trial
proof, multiple editions using different types of Japanese papers have to be
produced (Figure 27). One out of ten of each edition of the different
papers will be picked as the artist’s proof for the artist to keep (Figure 28).
Artist's proof is commonly known as a practice to reserve approximately ten
percent of an edition as artist's proof. It can be distinguished by the
abbreviation of AP on the lower left of the work.
 |
| Figure 27: Multiple editions of different type of Japanese papers |
 |
| Figure 28: Artist's proof (AP) |
Through the experience of
learning traditional multi-colour Japanese woodblock print, the
writer has learned that the effect of printing is based on the way the artist’s
control the pressure of baren and the thickness of the paper. Most of the
handmade Japanese paper is made as thin as a tissue paper, so if strong
pressure is applied, the paper will be easily torn (Figure 29). To achieve
a brilliant multi-colour Japanese woodblock print, years of experience and
practice is required as a lot of process is involved. This is conceded by
Vollmer A., (1998) who mentioned that successful printing requires a whole new
approach to understanding of traditional Japanese methods including the use of
special tools, careful preparation and countless numbers of practice.
What the writer likes the most about the woodblock print is that no press
is required and the printing can be set up even in the smallest studio. The
writer's vision is to continue exploring the technique until great results is
achieved. Through this study, the writer understands the qualities of great arts, which not only depending entirely on composition and artistic procedure, but as well as skill development. It has completely changed the writer's perspective towards the value of an art and appreciation of beauty.
 |
| Figure 29: Torned paper |


No comments:
Post a Comment